|
|
| ||
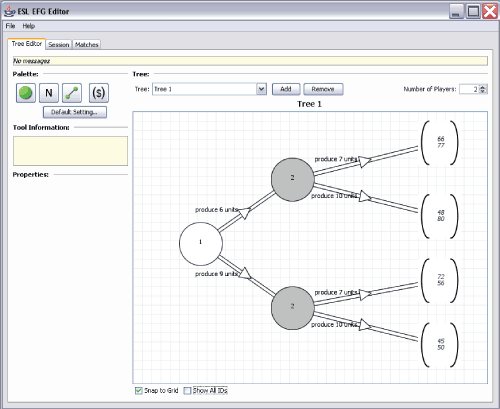
Tree Editor Tab

(Click here for a full-size image)
In the tree editor tab, you see on the left side:
Palette
The Palette contains four buttons that you will use in building a game tree, as well as a button that allows you to modify the Default Settings for the tools. These buttons have ToolTips attached, so if you need information on what they do, simply hover your mouse pointer over the button and text will pop up to remind you of the button's function. When a tool is selected, its properties will be visible in the area on the left side of the screen.
The four tools in the palette are:
1. Decision Node Tool
![]()
The green circle represents a decision node.
To place it in the grid area, select the decision node tool and click once with the mouse inside the grid area.
The Decision Node Tool indicates a player in your game. You will choose who this node will be. For example, player 1 or player 2. To select the player, click twice on the node. Its properties will be displayed on the left. By default, the player is unspecified.
2. Nature Node Tool
![]()
"N" is nature. It means that it's independent of players' decisions. The action that nature takes will be chosen according to probabilities that you have to assign in the action tool associated with the nature node.
To place it in the grid area, select the nature node tool and click once with the mouse inside the grid area.
3. Action Tool
![]()
The line with green circles at each end denotes the action tool, which represents an action connecting two decision nodes.
To place it in the grid area, first be sure you have a start and an end for your action. In other words, you should have placed a decision node or a nature node (for the start) and a decision node or a nature node or a payoff node (for the end) before you work with the action tool. Once you have the start and the end of the action, select the action tool and click once in the first node (the node that may take that action). A line will be floating on the board. Then, click on the node that will be the end of the action, i.e. the result of that action (which can be another decision node or a payoff node).
To include a label or probabilities to the actions in the case of nature, click twice on the action arrow. The properties will be shown on the left.
4. Payoff Node Tool
![]()
The payoff node will define the payoffs of the players given an action.
To place it in the grid area, select the payoff tool and click once with the mouse inside the grid area.
To modify values of the payoffs, click twice on the payoff node. The properties will be shown on the left. The first value is for player 1 and the second value for player 2.
5. Default Settings Button
This brings up a dialog box that allows you to change:
- Action Text Size - modifies the default text size associated with Action (arrow) labels (must be > 5)
- Action Label Location - modifies the default label location associated with Actions
- Action Width - modifies the default arrow width for Actions (must be > 0)
- Decision Diameter - modifies the default size of Decision Nodes (must be > 25)
- Decision Text Size - modifies the default text size of Decision Nodes (must be > 5)
- Payoff Text Size - modifies the default text size of Payoff Nodes (must be > 5)
- Payoff Width - modifies the default width of Payoff Nodes (must be > 25)
- Payoff Height - modifies the default heigh of Payoff Nodes (must be > 25)
There is also a checkbox titled "Apply to existing components". Checking this box will cause all modifications to be applied to all objects already created, on all trees.
Please note:
- For decision nodes, you will need to select which player takes the decision at that node.
- For actions, you can select a label.
If the action is one taken by Nature, you will need to enter the probability of each action being taken. - For payoff nodes, you will need to double-click on the "Value" cell in the table on the left hand side of the screen and enter payoff values for each player.
Tool Information: This area contains information about how to use the selected tool.
Properties: This area contains specific information about the properties of an object you have selected. This is where you can choose which player is associated with a given decision node, establish and edit labels or probabilities (in the case of a move by Nature) for a given action arrow, and enter or modify player payoffs for a given payoff node.
You see on the right side:
Tree: This section contains a drop-down menu to scroll through the trees within your experiment, buttons to add or remove a tree in your experiment, a scrollbox to modify the number of players in your experiment, as well as a large grid area where you will draw your game tree.
Snap to Grid: Selecting this checkbox forces nodes to be centered on an intersection point of the lines in the grid. Deselecting it will make the grid invisible and allow you to freely move the nodes
Show All IDs: This checkbox toggles the display of the IDs for all nodes in the game, as well as any actions associated with a move of Nature.
| Copyright 2006 Experimental Economics Center. All rights reserved. | Send us feedback |


