|
|
| ||
Setting Up Government Policies
By clicking on the appropriate box at the top of the screen, the experimenter may introduce different government policies such as price controls or fiscal measures. The right side of the screen contains boxes where the experimenter may input exact parameters for each governement policy.
There are 3 steps to implementing a government policy:
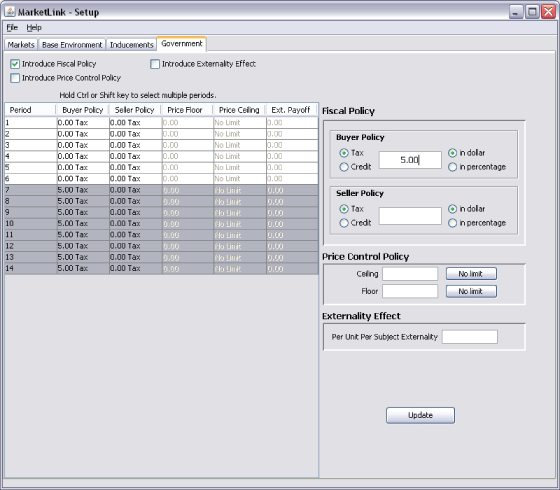
Step 1: Click on the table to highlight the appropriate period for which the policy will be enacted (hold down the [Ctrl] or [Shift] key to select multiple periods at the same time). The screen-shot below shows a $5.00 tax levied on buyers for periods 7 through 14.

(Click here to view a window image)
Step 2: Select one or more check boxes at the top of the screen, then enter the parameters for the policy in one of the boxes to the right. You must click "Update" to set the parameters for the periods you have selected. Otherwise your parameters will not appear in the table on the left-side of the screen.
- Introduce Fiscal Policy: Here a tax or subsidy may be levied on buyers or sellers in the market. The screen-shot above shows a configuration that introduces a fiscal policy in period 7.
- Introduce Price Control Policy: This section will allow you to introduce a price ceiling or a price floor.
- Introduce Externality Effect: This section can be used to introduce positive or negative market externality per unit per subject.
Buyer Policy
- Tax Radio Button: this button will implement a tax policy on buyers during the highlighted periods in the table.
- Credit Radio Button: this button will implement a credit (or subsidy) policy for buyers during the highlighted periods in the table.
The amount of the tax or credit may be entered in the neighboring box by clicking on the box and typing in the specific amount.
- Dollar Radio Button: this button will implement the tax or credit in dollars in the experiment. Notice that the Dollar Radio Button is selected to levy a $5.00 tax on the buyer in the screen-shot above.
- Percentage Radio Button: this button will implement the tax or credit in percentage terms of each subjects original inducement (costs for sellers, values for buyers).
Seller Policy
Editing the configuration in this box is essentially the same as that of the Buyer Policy box above. The only change is that the fiscal policy is enacted upon the sellers in the market instead of the buyers.
Price Control Policy

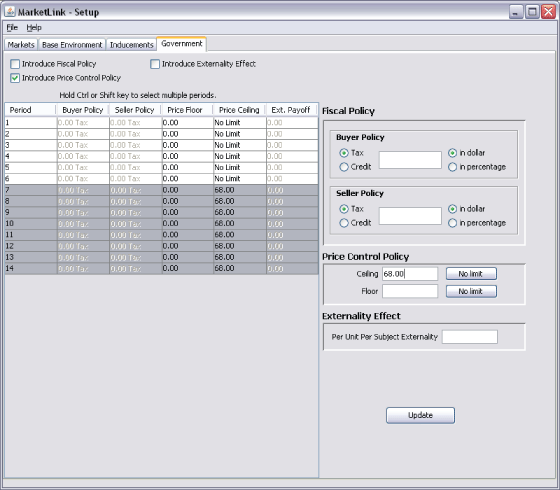
(Click here to open a window image)
- Ceiling: this box will allow the experimenter to specify the exact amount of the price ceiling (the highest price at which a trade may occur) for the highlighted periods in the table. The screen-shot above enacts a price ceiling of $68.00.
- Floor: this box will allow the experimenter to specify the exact amount of the price floor (the lowest price at which a trade may occur) for the highlighted periods in the table.
- No limit: selecting this button will cause the price control to revert back to it's default condition (no limit for a price ceiling and zero for a price floor).
Externality Effect

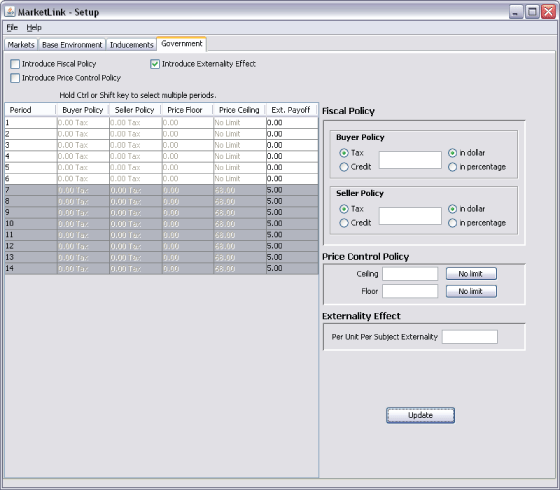
(Click here to open a window image)
- Per Unit Per Subject Externality: will allow the experimenter to specify the exact amount of the externality which will occur with each trade in the highlighted periods. In the screen-shot above a $5.00 positive externality is added to each subject in the experiment for each transaction that occurs during the highlighted periods.
Step 3: Checking the appropriate box at the top of the screen will activate the fiscal policy, price control, and/or externality effect that has been parameterized by the experimenter. Note that when the boxes are checked, information in the table changes from very light into bold-faced type. If the parameters you have not set are not in bold then your parameters will not be used in your experiment.
| Copyright 2006 Experimental Economics Center. All rights reserved. | Send us feedback |


